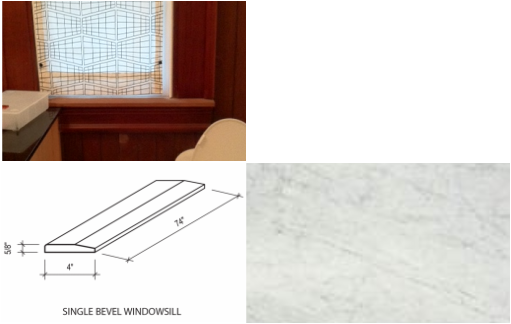
 The window sill There's a very unhappy meeting of the window, counter and window sill in the exisitng bath. The "robust victorian" casing around the window is about 6" wide with a corresponding 6" apron below. I just saw that Daltile makes a pre-fabricated beveled window sill in various stones including carrera marble.
I had considered just having the window sill fabricated from left over pieces from the countertop and that's what we may still do. Horizontal surfaces, particularly in moist areas like a bathroom are probably better served with a non-organic - easily washable surface. Since we're thinking of using carrera marble on the countertop, it could simplify and improve the meeting of materials. I'm also thinking of removing the wood casings and apron in a move towards a more consistent sleek look. The contrast between old and new that we had attempted before did not work out as well as it could.
0 Comments
I'm using Google sketchup to explore ideas. Its a great free modeling software product that many people including architects are using. 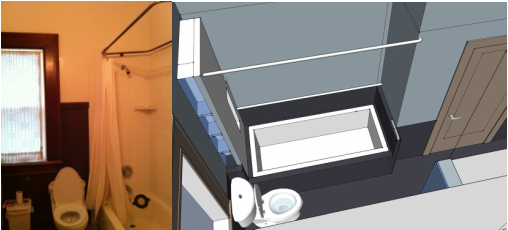 Right now the tub is set against the left wall and there is a low platform at the right end of the tub (not visible). It is tiled in white and has become a catch-all of clutter and ugly grout. The curtain rod is suspended from the 11' ceiling -- all in an attempt to recreate an original victorian feel.
We wanted to keep the tub from feeling too enclosed so we are not using a shower enclosure. I wanted to eliminate the platform so my first thought was to furr out the wall to meet the tub but that made the area seem constricted. Furring out the wall at the toilet end seemed a better option to eliminate the platform. I thought using a darker tile platform to set the tub in place would minimize the ugly grout issue. Finally, I wanted to eliminate the suspended curtain ring. The wall receiving the curtain rod at the foot of the tub does not extend far enough out to receive the rod so this rod bends back to the wall. Pre-fabricated shampoo niches are made by Tile Redi, Noble Niche, and others. I haven't used either product so this is not an endorsement. 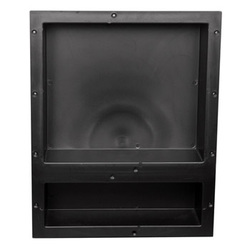 Minimizing the clutter of bottles is a good thing, particularly if everyone has their own special product.
Traditionally these niches are hand fabricated on-site by the installer or a ceramic soap dish can be used. The ceramic soap dish is usually too small for anything beyond soap and it can be kind of clunky visually. Now there are prefabricated units that can be recessed into the wall and the ceramic tile can be installed over it to form a continuous tile surface of the same material. Theoretically this should have a better waterproof seal as there are fewer exposed joints. I wonder if there is even a better way to hide the clutter? Pine Street Remodel - 002 - Ceramic Tile4/10/2011 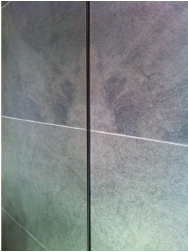 I've been looking at ceramic tile. One of the problems with ceramic tile are grouted joint lines. Sometimes the joint lines themselves become a visual feature to the benefit or detriment of the overall design. I want to minimize the impact of the joint line. Minimizing the impact of the grout line means minimizing the total amount of joints by using larger tiles and or narrower widths. This photo shows a grout line of about 1/16" which is probably the bare minimum. Even then, the tile edge must be very square and the quality control of the size of the tiles must be excellent. If there is any variation in size, you must accommodate it with a wider joint line. The larger the tile, the more unforgiving it is to any imperfections on the surface on which it is applied. Craftsmanship is important here. Another way of minimizing the joint line is to pick a grout color that "matches" the color of the tile. This usually works quite well unless the color changes with staining from mold or dirt. The grey tile and grey grout seems to solve both of these problems and is a good solution -- if you like grey (which I do). Fortunately the right grey can form an elegant backdrop for something else. 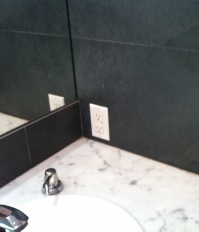 Here the grey tile contrasts with the white carrera marble allowing the marble to be the focus. Michelangelo used it and maybe we will too. This is your new blog post. Click here and start typing, or drag in elements from the top bar.
Pine Street Remodel -001 Letting Go4/9/2011 Here is a sketch and photo of the existing conditions. 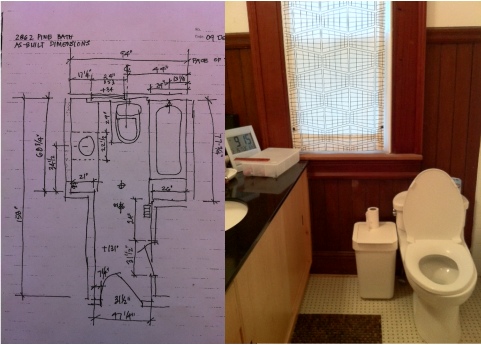 The only thing original in the room is the wood wainscot. It was stripped of many layers of paint in 1975 when I first bought the house. The result was a fairly dull slightly damaged brown surface. Years later, we had it stained and varnished to try and improve the appearance, but it wasn't much of an improvement.  Hello Husband Chris has been patient with my attachment to the "original" wainscot although a few years ago she sent me a message by painting a small section white. Well I guess I'm ready now. The wainscot is going to go. The wainscot is old clear heart redwood so it would be a shame to just trash it. Maybe the backside is in pristine condition and we could use it another way? Stay tuned.
AuthorThe Ahn-Mock Family blog. Feel free to comment. ArchivesCategories
All
|
 RSS Feed
